tie and dye techniques pdf
Tie and dye is a vibrant, expressive art form, detailed in numerous tie and dye techniques PDF guides, offering a fun DIY activity for all ages.
These guides showcase easy folding methods for spirals, bullseyes, and stripes, making colorful patterns accessible through simple, step-by-step instructions.
What is Tie and Dye?
Tie and dye, a remarkably versatile textile art, involves resisting dye uptake to create captivating patterns. Numerous tie and dye techniques PDF resources detail this process, explaining how fabric is manipulated – crumpled, twisted, folded, stitched – and secured, typically with rubber bands, before dye application.
This resistance prevents the dye from reaching certain areas, resulting in unique and often unpredictable designs. The core principle remains consistent: blocking dye penetration. These PDF guides often illustrate various techniques, from simple crumple methods ideal for beginners to more complex folding and clamping approaches for intricate designs. The beauty lies in its accessibility and the potential for personalized expression, making it a beloved craft for generations.
Historical Overview of Tie and Dye
The history of tie and dye stretches back millennia, with evidence found in ancient cultures worldwide. Many tie and dye techniques PDF guides acknowledge its roots in traditions like Shibori in Japan, Plangi in Indonesia, and Bandhani in India – each developing unique methods over centuries.
These ancient techniques, often documented and preserved through generations, demonstrate a sophisticated understanding of dye resistance. The 1960s and 70s saw a resurgence in popularity in Western cultures, becoming a symbol of counterculture and self-expression. Today, these historical techniques are readily accessible through online resources and PDF tutorials, allowing enthusiasts to explore and recreate these time-honored art forms, blending tradition with modern creativity;
Essential Materials for Tie and Dye
Tie and dye requires dyes like Rit Dye or Tulip kits, fabric, rubber bands, soda ash, and protective materials – details found in tie and dye techniques PDF guides.
Types of Dyes (Rit Dye, Tulip Tie Dye Kits)
Rit Dye offers a vast spectrum of colors and is excellent for achieving custom shades and vibrant results, often detailed in comprehensive tie and dye techniques PDF tutorials. It’s versatile, working well with various fabrics, and allows for greater control over the dyeing process.
Tulip Tie Dye Kits, conversely, provide a convenient all-in-one solution, especially for beginners. These kits typically include pre-measured dyes, gloves, and rubber bands, simplifying the process. Many tie and dye techniques PDF resources demonstrate projects using Tulip kits, highlighting their ease of use and suitability for quick, fun projects.
Choosing between Rit Dye and Tulip kits depends on your desired level of customization and experience. Rit Dye is ideal for experienced dyers seeking precise color control, while Tulip kits are perfect for beginners and quick crafts, as explained in many downloadable guides.
Fabric Choices (Best Materials for Tie Dye)
Natural fibers excel in tie-dye projects, with cotton leading the way due to its absorbency and affordability, frequently showcased in tie and dye techniques PDF guides. Rayon and linen are also excellent choices, offering beautiful drape and vibrant color uptake.
Synthetic fabrics, like polyester, require specialized dyes and often yield less intense colors. Blends containing at least 60% natural fiber generally work well, but results can vary. Detailed tie and dye techniques PDF resources often specify fabric compositions for optimal outcomes.
Pre-washed fabrics are crucial for preventing shrinkage and ensuring even dye absorption. Heavier weight fabrics, like canvas, hold their shape well, while lighter fabrics, like muslin, create softer, more flowing designs. Choosing the right fabric significantly impacts the final result, as illustrated in numerous tutorials.
Tools and Supplies (Rubber Bands, Soda Ash, Paper Towels, Plastic Protection)
Essential tools for tie-dye, detailed in tie and dye techniques PDF guides, begin with rubber bands – various sizes are useful for creating diverse patterns. Soda ash is vital for preparing the fabric, ensuring dye bonds effectively; always handle with gloves! Paper towels are indispensable for blotting excess dye and protecting surfaces.
Plastic protection, such as drop cloths or plastic sheeting, is crucial to prevent staining your workspace. Dye bottles or applicators allow for precise dye application. Buckets are needed for mixing dyes and rinsing fabric. Many tie and dye techniques PDF resources list complete supply checklists.
Gloves protect your hands, and a well-ventilated area is recommended. Having these supplies readily available streamlines the process, leading to more enjoyable and successful tie-dye creations.
Basic Tie and Dye Techniques
Tie and dye techniques PDF tutorials reveal simple methods like crumpling, spiraling, bullseyes, and stripes, offering accessible entry points for beginners to explore this vibrant craft.
The Crumple Technique
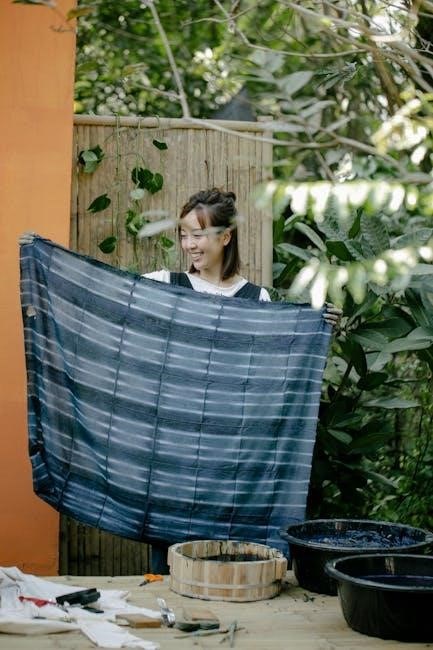
The crumple technique, frequently detailed in tie and dye techniques PDF guides, stands as a remarkably simple and wonderfully effective method for creating unique patterns. This technique is ideal for beginners due to its forgiving nature and minimal requirements. To begin, lay your pre-washed fabric flat and randomly crumple it into a tight mass.
Secure the crumpled fabric firmly with multiple rubber bands, ensuring the fabric remains compressed. These bands will act as a resist, preventing dye from penetrating certain areas. Apply various dye colors across the crumpled surface, allowing them to blend and interact. The beauty of this method lies in its unpredictability; each piece is truly one-of-a-kind.
Many tie and dye techniques PDF resources emphasize that the more random the crumples, the more interesting the final design will be!
The Spiral Technique
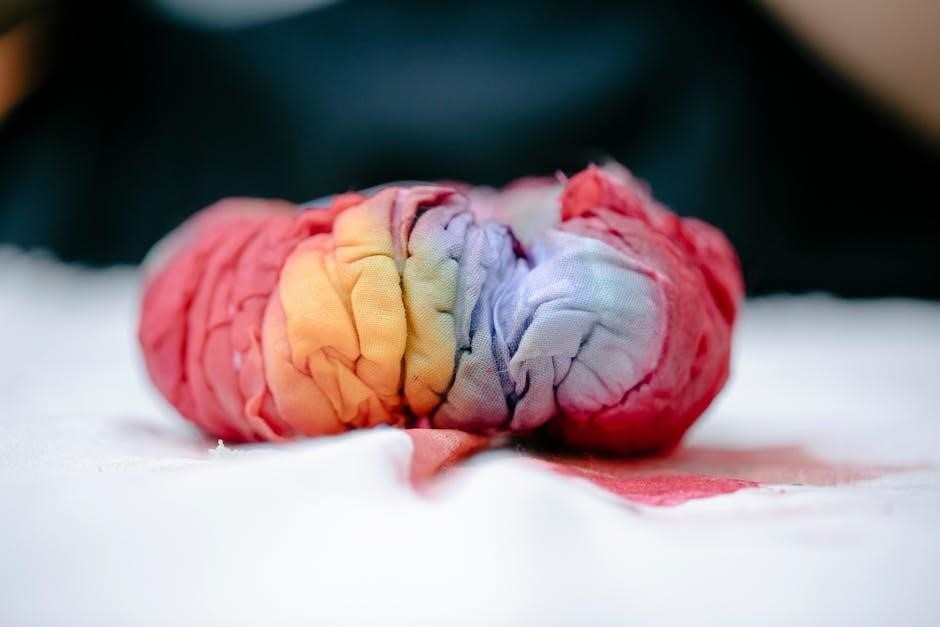
The spiral technique, a cornerstone of tie-dye artistry, is thoroughly explained in many tie and dye techniques PDF tutorials; This method creates iconic swirling patterns and is a favorite among both beginners and experienced dyers. Begin by pinching the center of your pre-washed fabric and twisting it into a tight spiral, resembling a cinnamon roll.
Secure this spiral firmly with multiple rubber bands, dividing it into pie-shaped sections. These bands will define the individual color zones within the spiral. Tie and dye techniques PDF guides often recommend applying different dye colors to each section, enhancing the vibrant, kaleidoscopic effect.
Remember to saturate the fabric thoroughly with dye for optimal color payoff. The spiral technique consistently delivers stunning results, making it a popular choice for creating eye-catching designs.
Folding for Spiral Patterns
Folding for spiral patterns, as detailed in numerous tie and dye techniques PDF resources, is crucial for achieving a well-defined design. Start with a flat, pre-washed garment. Pinch the fabric at the center point, creating a cone-like shape. Then, begin twisting the fabric, maintaining the central pinch, until it forms a flat spiral resembling a cinnamon bun.
The tightness of the twist influences the final pattern; a tighter twist yields more defined spirals. Secure the spiral with rubber bands, dividing it into wedge-shaped sections. Tie and dye techniques PDF guides emphasize the importance of evenly spaced rubber bands for symmetrical results.
Experiment with the number of sections to vary the complexity of the spiral. Proper folding is the foundation for a beautiful, vibrant tie-dye creation.
Applying Dye to Spirals
Applying dye to spirals, as illustrated in many tie and dye techniques PDF tutorials, requires careful technique for optimal color saturation. After securing the spiral with rubber bands, place the fabric on a protected surface with paper towels underneath. Tie and dye techniques PDF guides recommend applying dye to each wedge section individually, ensuring the dye penetrates the fabric thoroughly.
Alternate colors for a rainbow effect, or use complementary shades for visual interest. Flip the fabric over and repeat the dye application on the reverse side, ensuring even coverage; Use squeeze bottles for precise dye placement, avoiding oversaturation.
Allow the dye to sit for the recommended setting time (6-8 hours or overnight) for vibrant, lasting results.
The Bullseye Technique
The Bullseye Technique, frequently detailed in tie and dye techniques PDF resources, creates concentric circles of color. Begin by pinching the fabric at the point where you want the center of the bullseye to be. Secure this point tightly with a rubber band. Continue adding rubber bands at regular intervals, creating a series of concentric circles.
Tie and dye techniques PDF guides emphasize applying different colors of dye to each section between the rubber bands. This creates a vibrant, layered effect. Ensure dye penetrates both sides of the fabric for even color distribution.
This technique is simple yet effective, yielding striking and classic tie-dye patterns.
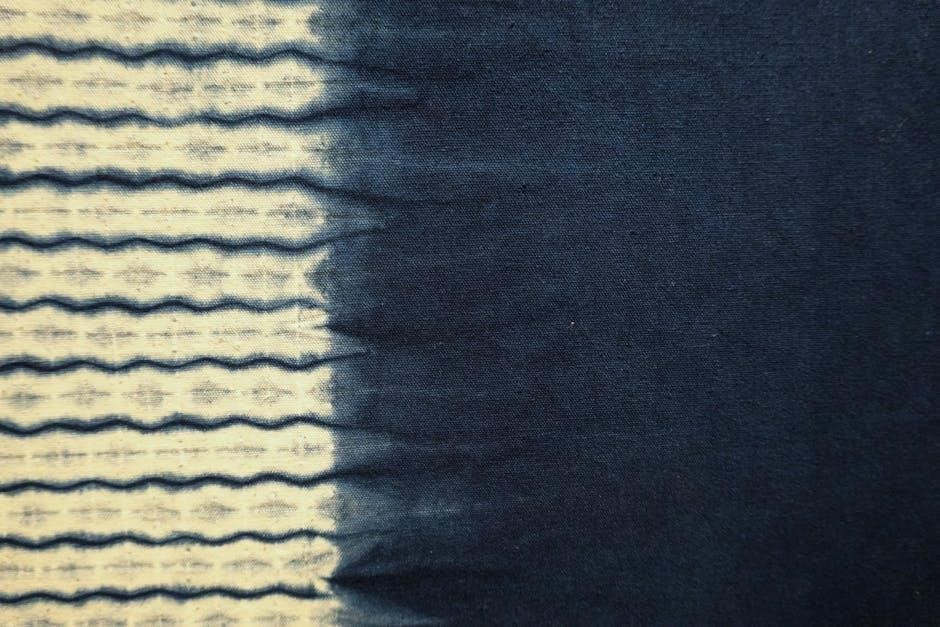
The Stripe Technique
The Stripe Technique, clearly illustrated in many tie and dye techniques PDF tutorials, is one of the easiest methods for beginners. Begin by folding your fabric accordion-style, like a fan. The tighter the folds, the narrower the stripes will be. Once folded, securely bind the entire length with multiple rubber bands, spaced evenly apart.
Tie and dye techniques PDF guides recommend applying different dye colors to alternating sections between the rubber bands. This creates a visually appealing striped pattern. Ensure the dye saturates the fabric thoroughly for vibrant results.
This technique offers a clean, modern aesthetic and is perfect for creating colorful garments.
Advanced Tie and Dye Techniques
Advanced tie and dye techniques PDF resources detail intricate methods like clamping, stitching, and mandala designs, elevating fabric art beyond basic patterns.
Folding and Clamping Techniques
Folding and clamping techniques, extensively covered in tie and dye techniques PDF tutorials, unlock complex and precise designs. Beyond simple crumpling or spiraling, these methods involve meticulously folding fabric – often accordion-style or into specific geometric shapes – before securing it with clamps.
These clamps, rather than rubber bands, create sharper, more defined resist lines, resulting in patterns with greater detail. PDF guides demonstrate how varying clamp placement and pressure influences the final outcome. Some techniques combine folding and clamping for layered effects. This allows for intricate patterns, resembling architectural designs or abstract art, offering a significant step up in complexity from beginner methods. Experimentation with different folding styles and clamp arrangements is key to mastering these advanced techniques.
Stitching Techniques for Designs
Stitching techniques, detailed in many tie and dye techniques PDF resources, represent a sophisticated approach to resist dyeing, moving beyond rubber bands and clamps. These methods involve using a needle and thread to create intricate patterns directly on the fabric before applying dye.
PDF guides illustrate various stitches – running stitch, backstitch, and even more complex embroidery-like designs – to create precise resist areas. Pulling the thread tightly gathers the fabric, forming unique textures and shapes. This allows for highly customized designs, from simple geometric motifs to elaborate floral patterns. Stitching offers unparalleled control, enabling artists to create truly unique and personalized tie-dye pieces. Mastering these techniques requires patience and precision, but the results are often stunning.

Using Mandalas in Tie Dye
Mandalas, often explored in tie and dye techniques PDF tutorials, offer a pathway to creating symmetrical and visually captivating designs. This technique requires precise folding and tying to achieve radial symmetry, mirroring patterns around a central point.
PDF guides demonstrate how to fold fabric repeatedly into smaller and smaller squares or triangles, securing each section with rubber bands. Different dye colors are then applied to specific areas, resulting in intricate mandala patterns when the bands are removed. Achieving a perfect mandala demands careful planning and execution, but the resulting artwork is incredibly rewarding. It’s a beautiful blend of art and textile design, offering a meditative and creative experience.

Preparing Fabric for Tie and Dye
Tie and dye techniques PDF resources emphasize pre-washing fabric to remove sizing, ensuring even dye absorption and vibrant, lasting colors for your project.
Pre-Washing Fabric
Pre-washing your fabric is a crucial, often overlooked step detailed in most tie and dye techniques PDF tutorials. New fabrics frequently contain sizing – a starch or polymer applied during manufacturing – which prevents the dye from properly penetrating the fibers. This results in uneven color absorption and a potentially faded or washed-out final product.
To properly prepare your material, machine wash it on a warm or cold cycle with a mild detergent. Avoid using fabric softeners, as these can also interfere with dye absorption. Tumble dry on low heat or hang to dry completely. This process removes the sizing, opens up the fabric fibers, and creates a clean surface for the dye to adhere to, guaranteeing a brighter, more durable, and visually appealing tie-dye design.
Soda Ash Soak (Importance and Procedure)
Soda ash, or sodium carbonate, is vital for vibrant tie-dye results, a point consistently emphasized in tie and dye techniques PDF guides. It raises the pH of the fabric, enabling the dye molecules to bind more effectively with the fibers, particularly with plant-based materials like cotton. Without a soda ash soak, colors may appear dull or wash out quickly.
To prepare the soak, dissolve one cup of soda ash per gallon of warm water, stirring until fully dissolved. Always wear gloves and eye protection when handling soda ash, as it can be irritating. Submerge the pre-washed fabric for 5-15 minutes, ensuring complete saturation. Wring out excess solution – do not rinse – and proceed immediately with the tie-dye process.

Applying Dye and Setting the Color
Tie and dye techniques PDF resources detail applying dye to both sides of the fabric, then letting the project set for 6-8 hours, or overnight;
Dye Application Methods
Tie and dye techniques PDF tutorials emphasize several dye application methods for achieving diverse effects. Many guides recommend placing the tied shirt on paper towels atop a plate, covered with plastic for mess prevention.
Applying dye directly onto the fabric, ensuring saturation in each section, is crucial. Some PDFs suggest using squeeze bottles for precise control, especially when creating intricate designs like spirals or mandalas.
For broader coverage, brushes can be utilized. Remember to flip the fabric and repeat the process on the opposite side to ensure even color distribution. The tie and dye techniques PDF resources also highlight the importance of wearing gloves during dye application to protect your skin.
Setting Time (6-8 Hours or Overnight)
Tie and dye techniques PDF guides consistently stress the importance of adequate setting time for vibrant, long-lasting colors. After dye application, allowing the dye to bond with the fabric is essential.
Most resources recommend a setting time of 6-8 hours, though overnight is often preferred for deeper, more saturated hues. During this period, the dyed fabric should remain undisturbed, ideally in a plastic bag or container to maintain moisture.
PDF tutorials explain that this extended setting time allows the dye molecules to fully penetrate the fabric fibers. Rushing this process can result in faded colors or dye bleeding during washing, so patience is key, as detailed in many tie and dye techniques PDFs.

Finishing the Tie and Dye Process
Tie and dye techniques PDF guides detail final steps: removing bands, rinsing thoroughly, washing, and drying to reveal your unique, colorful creation!
Removing Rubber Bands
Tie and dye techniques PDF resources emphasize careful rubber band removal as a crucial step. Once the dye has set for the recommended 6-8 hours, or ideally overnight, it’s time to unveil your design. Gently snip each rubber band with scissors, avoiding cutting into the fabric itself.
Be cautious, as the fabric will still be saturated with dye and potentially fragile. Pulling the bands can distort the pattern, so cutting is preferred. Many guides suggest working over a protected surface to contain any residual dye that may release during this process.
Removing the bands reveals the beautiful, intricate patterns created by the resist dyeing process, a satisfying moment after the creative effort!
Rinsing and Washing
Tie and dye techniques PDF tutorials consistently highlight thorough rinsing and washing to remove excess dye. Begin by rinsing the dyed item under cold running water until the water runs clear – this can take a significant amount of time.
Next, wash the garment separately in cold water with a mild detergent. Many guides recommend using a detergent specifically designed for colored fabrics to prevent fading. Avoid washing with other clothes during the first few washes, as some dye may still bleed.
This process secures the color and prevents staining other items. Following these steps ensures a vibrant, long-lasting tie-dye creation!
Drying and Wearing
Tie and dye techniques PDF resources emphasize proper drying to maintain vibrant colors. After rinsing and washing, gently squeeze out excess water – avoid wringing, which can distort the design.
The best method is to hang the item to dry, preferably in a shaded area, as direct sunlight can cause fading. Tumble drying is generally discouraged, especially for the first few washes.
Once completely dry, your unique creation is ready to wear! Enjoy the fruits of your labor and the personalized style that tie-dye offers. Remember to check for any remaining dye bleed before wearing with light-colored clothing.
Troubleshooting Common Tie and Dye Issues
Tie and dye techniques PDF guides address issues like color bleeding and uneven distribution, offering solutions for vibrant, lasting results and design clarity.
Color Bleeding
Color bleeding in tie-dye projects is a common concern, often addressed in detailed tie and dye techniques PDF resources. This typically occurs when dyes aren’t fully set or when fabrics are washed improperly. PDF guides emphasize the importance of thorough rinsing after dye application, continuing until the water runs completely clear.
Insufficient dye fixation is another culprit; proper use of soda ash during fabric preparation, as outlined in many tutorials, is crucial. Some guides suggest using a color fixative after rinsing to lock in the dye molecules. Additionally, washing tie-dyed items separately for the first few washes minimizes color transfer to other garments. Choosing high-quality dyes, like Rit Dye, also contributes to better color retention and reduces bleeding potential, as detailed in various PDF guides.
Uneven Dye Distribution
Uneven dye distribution is a frequent challenge in tie-dye, comprehensively covered in tie and dye techniques PDF tutorials. These resources highlight the necessity of saturating the fabric thoroughly with dye, ensuring it penetrates all layers, especially within tightly bound areas.
PDF guides often recommend flipping the fabric over and applying dye to both sides, using a bottle for precise application. Consistent dye application is key; avoid pooling or dry spots. Proper fabric preparation, including a soda ash soak, aids in even dye absorption. Furthermore, some guides suggest gently massaging the dye into the fabric to promote uniform color uptake. Using paper towels underneath, as described in many tutorials, helps monitor saturation and prevent messes.

Resources for Further Learning (PDF Tutorials)
Tie and dye techniques PDF guides offer detailed instructions, from basic spirals to advanced mandalas, enhancing your skills and creative potential.
Online Tie and Dye Tutorials
Numerous online platforms host comprehensive tie and dye techniques PDF-supported tutorials, catering to all skill levels. Websites like I Love to Create provide photo tutorials demonstrating the classic crumple technique, ideal for beginners seeking easy designs on shirts and fabrics.
Video tutorials further enhance learning, visually guiding you through each step – from pre-washing fabric and soda ash soaks to dye application and finishing. These resources often complement downloadable tie and dye techniques PDF guides, offering a multi-faceted learning experience.
Explore platforms like YouTube for a wealth of demonstrations covering spiral, bullseye, and stripe patterns. Many tutorials specifically reference Rit Dye and Tulip Tie Dye kits, providing practical guidance for using popular materials. These online resources empower you to confidently experiment and create unique, personalized tie-dye masterpieces.
Tie and Dye Pattern Guides (PDF Downloads)
Accessing tie and dye techniques PDF guides unlocks a treasure trove of patterns, ranging from simple to intricate designs. These downloadable resources often detail folding and clamping techniques, alongside stitching methods for creating unique motifs like mandalas.
Many guides provide step-by-step instructions with visual aids, making complex patterns more approachable. They frequently include color combination suggestions and troubleshooting tips for common issues like color bleeding or uneven dye distribution.
Searching online will reveal numerous free and premium tie and dye techniques PDF options; These guides often specify material requirements, dye types (Rit Dye, Tulip kits), and essential tools like rubber bands and soda ash, ensuring a successful tie-dye experience. Downloadable PDFs offer convenient, offline access to inspiration and guidance.